Monday, December 19, 2011

Personalized Letter From A Disney Princess

So I decided to write a letter to Tiana of The Princess and the Frog...because I saw it on Pinterest.

"Write a Letter to Your Favorite Disney Character and Get an Autographed Picture in Return"-This pin originally came from Couponing to Disney.

(This post originally began in Novemeber.)

Miss Precocious is obsessed with The Princess and the Frog!  Obsessed!


Except it sounds more like "The Friendses and Frog" when she is demanding to watch it.  And I will surely miss it when it comes out sounding right...

Anyway, I saw this pin that says you will receive an autographed picture of your favorite Disney character if you send them a letter to this address:

Walt Disney World Communications
P.O. Box 10040
Lake Buena Vista, FL 32830-0040

Or, if you'd prefer, you can receive a black and white photo if you write to your chosen character at this address:

Walt Disney Company
Attn: Fan Mail Department
500 South Buena Vista Street
Burbank, CA 91521

The black and white photos take longer to receive and if I'm being honest, patience is not really on my list of virtues.  So our letter is definitely going to Florida.

I used one of the homemade envelopes from an earlier postLOVE these!  And they are totally fit for a princess.


Our letter was simple: 
 
"Dear Princess Tiana, 
I love you and I can't wait until I am big enough to come visit you.  Until then, could you please send a picture?
Love,
Miss P"

And because most of you don't know me and you can't actually picture me doing this, I will tell you that I literally ran alongside the mailman's truck trying to give him this letter.  And it was hysterical (not for me, but for anyone who might have been peeking out their window).

I had just missed getting it in our box but he was still on my street.  Yet somehow he didn't see me running along side him.  Or my fat dog. Or my hysterically laughing toddler.  Imagine that!  (Told you he hates me!)

Since he 'didn't see me' and the letter didn't get mailed today (Thursday) it will go out on Saturday because tomorrow is Veteran's day and the mail won't run.  Now I'm getting annoyed that he didn't see me because that letter is going to sit in our mailbox for two days...  OK so mailed on the 12th of November.  And...

Did we receive a response from Tiana?

Yes!  Today is 12/19 so just about 5 weeks later we received a lovely postcard.


Signed by ALL of the Disney Princesses!  Miss P was beside herself with joy when we got the mail today!  (It's the little things.)


What a fun way to surprise your little one!   And it will only cost you $0.45.  Can't beat that!

Thanks Pinterest!

Friday, December 16, 2011

Mickey & Minnie Mouse Cupcakes

So I decided to make Mickey and Minnie Mouse cupcakes...because I saw it on Pinterest.


The original pin is just a picture in cyberspace found at this link.  The link looks sort of shady...and all you will find there is the exact picture I posted.  Maybe don't click it?

Computer-virus-paranoia be gone.

Ok.  Aren't those cupcakes adorable?  Miss P is a huge fan of Mickey Mouse Clubhouse (and the hot dog dance)!  So when I saw these cupcakes, I knew I had to make them for her.  Or with her, as it turned out.

Let's get started. 

This is what you will need:


Cake mix (and everything needed for that), Mini Oreos, Oreos, two sticks of butter, 7-8 cups powdered sugar (2lbs), and some milk. 

Oh and a sweet little pair of hands, eager for an opportunity to help (or sneak frosting).

You could just use tub frosting...but buttercream is tres delicious.  

And I guess the kind of liner you use is up to you, but I really wanted to be authentic Mickey/Minnie Mouse, so I bought red and white polka dot liners.  You can find them here on Amazon for $3.94 with free shipping. There are 50 in a pack and they held their color really well during baking.  

While I mixed the cake, my sous chef lined the cupcake pans...


Look at that little hand!!!  Love.

While the cupcakes were baking, we started working on the buttercream.  I don't strictly follow any particular recipe.  I always start with two sticks of butter and the rest varies each time depending on what the bc looks like in the bowl.  

If you want to make some delicious buttercream, start by cutting up two sticks of butter (I do this with butter straight from the fridge):


Hahahahaha!  Can you tell I had some help here?

Add about 1/3 cup of milk and 1 cup of powdered sugar.  Start the mixer on low.  Then gradually add in more and more powdered sugar and milk (no more than another 1/3 cup of milk) until you reach a smooth but sturdy consistency.  


The buttercream will taste better if you have some sweet little hands directing the stand mixer.  Trust me.

If you are frosting a cake you will want the bc to be more firm, but if you are piping cupcakes it needs to be a little less firm. 

I used almost all of the 2lb bag of sugar.  There is probably about 1 cup left so I that means I used about 7 cups. 


Now that's a lot of sugar!

I don't know about you, but these look perfect to me.  Just cake...

Miss P and I are a perfect team.  She only likes the frosting and I only like the cake.  

Even though I don't care about eating the buttercream, I do love to decorate with it!

I used my favorite Wilton 1M tip.  Pretty swirls of yummy goodness:


So perfect.

This was the point in the project where I wished there had been an actual site linked to the original pin.  Because I had no idea how to make bows for the Minnie cupcakes.  

I just winged it (where did that saying even come from?)...


I thought I would tint some candy melts red and pipe them into the shape of a bow.  

Have you ever worked with candy melts?  They don't like to be tinted.  I think the only reason it worked for me this time is because I used a gel color and not a liquid.  And I only used a very tiny amount.  You can't add liquid to candy melts because it will turn them into a clump of shame. 

Another thing I don't like about candy melts is that they harden back up extremely fast.  Like literally by the time I had transferred them from the bowl I melted them in to the bottle, they were too cool to pipe.  That's why I keep this handy:


That's a mug full of steamy hot water.  

I piped some bows onto a sheet of wax paper and let them dry for about 10 minutes.  

Meanwhile, I assembled the mice.  And I figured out that they play much nicer if you only use one side of the Oreo.  The cookies were a little too bulky for the cupcake when they were whole.

Also, OCD induced tantrums can be avoided if you make sure your 'OREO' imprints are all facing the same way.
Not that I had to redo any...


Hi there, Minnie!  What a lovely bow you have!

You're lonely?

How about a friend?


Don't they look happy together?


You can literally see how fast those sweet hands removed the bow! 

"Nom, nom, nom..."

This project was easy peasy and made my little one super happy.  I only wish I could have done a better job on the bows!  If I did this for a birthday party, I would definitely try to order candy bows from somewhere because piping them out of candy melts was not the way to go.  Overall, a solid B+.  Can you really go wrong with cupcakes? 

Wednesday, December 14, 2011

Friendship Bracelet Earbuds? RAD!

So I decided to friendship bracelet my earbuds...because I saw it on Pinterest.

Earlaces Lime Forest-Original pin by Chozin on Etsy

Oh yes!  I grew up in the 80's and I made at least 415 friendship bracelets between 1987 and 1993.

In retrospect, I wonder why my mom had so much DMC thread around.  She was definitely an avid cross-stitcher, but seriously...this is what her craft room looked like when you opened the door:


A literal wall of DMC thread.  

No, not really.  But she did have every single color (in multiples)!  And they were neatly organized in these special clear bags with the numbers (because each color has a number) written clearly on the outside of the bag.  And don't you dare get them mixed up!  For heaven's sake.

I can't tell you how many hours my sister and I spent making friendship bracelets!  We would pick our colors, safety pin the thread to our jeans, and take turns playing Super Mario Brothers while eating Doritos.  Amen!


(Hold A B Start to make your game pick up at the last level you were on if you run out of lives!)

Oh the memories.  GOOD FREAKING TIMES!

Well I was looking around Pinterst and saw that little earbud gem.  And I felt all warm and fuzzy.  The feeling you can only get when Nostalgia creeps in. 

I don't even use my iPod anymore, but I do have an earbud headset for my Blackberry.  

Because I am not the best driver to start with (ask the side of my parents' house) and I think cell phones probably can give you cancer being stuck to your head like that all the time.  And because I am a super nerd.  So I plug my little nerdy headset in and pretend I'm listening to some music when really, I'm talking to my mom.  

And now you know the truth.  I'm just trying not to hit your mailbox.

Anyway, my headset is constantly in a tangled mess.  Drives me banana sandwich!  So I knew I had to at least try to friendship bracelet it.  Not just because all the cool kids are doing it, but because it will keep it from getting tangled!

Speaking of the cool kids...


Do you remember this amazing episode of Saved By The Bell?  It was called The Friendship Business (Episode 11, Season 1-Oh yeah, we have the boxed set).  From IMDB: "As part of a business class assignment, the gang makes and markets friendship bracelets, but when tensions escalate, Jessie, Kelly, and Slater break off to form their own rival business - Buddy Bands."

Ha!  The title of this post isn't "Buddy Band Earbuds!"  So...I think Zack wins again.  Sorry, Slater.

While I'm off on a tangent and I have toasty warm Nostalgia coursing through my veins...let me just share with you one of the best Christmas presents I have ever received:


YES!!  A 'My Little Pony' radio!  I was 4.  It was amazing.  And I would take my pony headphones over fancy earbuds any day.

Just let out a big sigh of happiness...

Back to business. 

I was was at my parents' house over Thanksgiving and I thought..."I wonder if the amazing DMC stash is still around."  Because free thread is better than a trip to Hobby Lobby.  And I am pleased to report that, while the stock has been depleted over the last 18 years, there was still at least 200 little organized bags to choose from!  Love you, Mom!

I picked pink.  Lovely, eh?


Do you remember how to make friendship bracelets?  I'm sure you do.  So I won't try to break it down into a million steps. 

How about one step?

Tie some knots :)


It was like riding a bike!  As soon as I tied that first knot, it was like...magic.  It all came back to me!  

If only I had a safety pin, my old NES, and a bag of Doritos.  

Another big sigh...

I thought I would just do it all in pink.  But I grossly underestimated the amount of thread I needed to cover this beast so I ended up adding some blue...but I grossly underestimated that one as well.  So I added some red.  

Yep.  Blue, red, pink...three colors that you always see together.  Duh.
 
You likey?


Totally cooler than any old Buddy Band and it doesn't get all tangled up anymore!  

Now I'm not hitting your mailbox in style!  

Totally rad!

Monday, December 5, 2011

Framed Burlap Earring Holder

So I decided to make a framed burlap earring holder...because I saw it on Pinterest.

"Framed Burlap Earring Holder Tutorial"-Original pin by Positively Splendid

Do y'all remember my mom?  The amazing lady who gave me life and a stand mixer?  Well I have been wanting to help her devise a plan to sort her 843 pairs of earring for some time now.  When I saw this framed burlap earring holder I was smitten.  It's perfect.  It's so out of the box!!

Like literally out of the jewelery box.  It's perfect.  And it can hang on the wall in her closet and take up zero space.  Truly the best idea I have seen in a while! 

I haven't had time to make it until now, which is actually perfect because I can give it to her for Christmas.  She's been extra nice this year :)

This is what I started with:

You will need a frame, piece of burlap just larger than your frame, and some hot glue or a staple gun.  If you want to add an embellishment (like a monogram) on the burlap, you will need a permanent marker.  And I used some felt and ribbon to make a flower for the corner.

The frame is recycled.  I had a picture in it that really highlighted my unfortunate case of UFD.  And that sort of spoiled the frame for me.  I even changed the picture once to see if that helped, but it was too late.  So I'm really glad to give this frame new life at a new home!.  

First I removed the glass and backing of the frame.  Then I cut a little notch in the burlap to accommodate the wall hook.  


I really should have been a little more careful when ordering my burlap because I just barely had enough to cover the frame.  I haven't been crafty long enough to know how to order fabric, apparently.

Which I was regretting when I tried stretching my burlap during the hot gluing process because there wasn't any hanging over the sides to pull on. 

So I had to pull on the piece as I was gluing it down, which made for some very sad, hot-glued fingertips.  Lesson learned (hopefully).

I stretched it as tightly as possible all around the frame and trimmed off the little bit of edge I had on two of the sides:


After I had the burlap stretched as tight as I could get it, I decided to check the original post for instructions.  Did I just hear you ask, "Why didn't you check it before beginning the project?"

I'm thinking of renaming my blog 'Because I Saw It On Pinterest and Didn't Bother to Read the Instructions.'  Because no matter what lesson I supposedly learn every week, I still fail to read the directions on the next project.  For example, the tutorial over at Positively Splendid clearly says (in Step One!), "Spray your piece of burlap generously with your spray starch, and iron the piece until it is dry."  I was too lazy to read that little bit of helpful info.  And it was the first sentence of the tutorial.  Lazy.

So here I am with scalded fingertips looking at my already-glued-down burlap...

I did what I had to do.


No, my Magic Sizing doesn't defy the laws of Physics.  Note to self...figure out a way to import pictures without making them read-only! Not being able to turn them around is maddening!

All starched, ironed, and glued into place:


You could stop here but the next steps are the most fun...decorations!!  

Now fancy pants Positively Splendid says to use a die cut machine to make a letter stencil.  But I don't have a die cut machine.  Mostly because there are about 100 things higher up on my list of items to buy with $250.  

Like groceries :) 

This is a working girl's version of a Cricut:


Yes.  PowerPoint and a pair of scissors.  

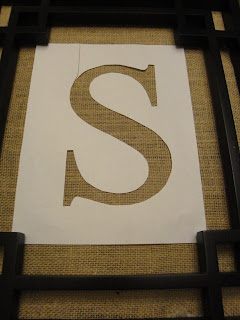
I used a blank template, Mongoli font set at 800pt, and I chose the 'no fill' option (no sense in wasting ink!).  I also rotated the text box to portrait so that I could get my monogram as large as possible on the paper.


I just taped my ghetto stencil down on the burlap and traced the inside of the stencil with my black magic marker.  


Then I removed the stencil and filled in the letter.  

Now who's fancy?

Again, I really could have stopped here and I would have been totally happy with the way it looked but I wanted to try felt flowers.  I have never made them before and Positively Splendid has another tutorial about how to make the cute felt and burlap flower shown on the original frame. 

I used red felt and some candy cane striped ribbon to make my flower.  And burlap for the leaves.


The ribbon is 2in wide and I cut about 8in off. This will be the center of the flower.  I folded it in half lengthwise and glued it down the edge.  Then I cut in at the fold about every half inch. I didn't take a picture of this process for the ribbon because I didn't think it was going to work.  I don't remember why I thought that because it totally did!  

Next, I cut the felt 3in wide and I think the square I had was 10in long.  (I wish I could be more precise but if Miss P sees a sticker-like the one on the back of the felt square that told the size- nothing can stop her sweet little hands from stealing it...and sticking it somewhere like the glass window of the oven...where I will never be able to fully remove it.)

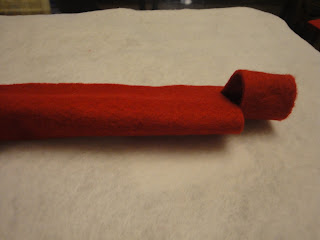
I did take a picture of the gluing process for the felt:


Anyway...I cut it on the folded non-glued side about every half inch.  


Next, I started rolling the center striped piece around itself (petal side up) and glued the end down.  Then I glued the red felt around the center piece. 


Now doesn't that look nothing like Positively Splendid's flower??  I swear I read the instructions for it.  But no matter.  I think it looks cute anyway!

I cut out two burlap leaves.  But I didn't like the look.  What do you think?


So no leaves it is!  I just glued the flower down to the frame and it was done.  

I love it!  

And I'm glad the frame is so big because my mom is seriously an earring hoarder.  But I like that about her!  Its her thing.  An earring for every occasion. 

Overall I give this project an A+!  It was nearly free.  I already had everything but the burlap which cost about $1.50 for half a yard. The felt flower was a little annoying because I kept trying to make it look like the original pin.  But when I decided not to be frustrated, the flower suddenly became pretty cute.  

The best part of this project is that I know my mom is going to LOVE it!  And it is going to be super useful for her.  I'm going to keep this one on my list of possible gifts for future occasions.  I mean, who wouldn't want one?

Have fun making yours!